Table of Contents
- Before You Do Anything — Read This First
- Quick Checks You Can Do Right Now
- 8 Common Reasons Your AC Isn't Cooling
- Is Your AC Frozen? Here's What to Do
- DIY Fix or Call a Technician? Here's How to Decide
- What AC Repairs Actually Cost (And How to Avoid Overpaying)
- How to Stay Cool While You Wait for Repair
- Frequently Asked Questions
An AC not blowing cold air is one of the most miserable home problems you can have — especially because it always seems to happen on the hottest day of the year. The good news: the most common causes are also the most fixable, and a few of them are genuinely free to resolve yourself. The bad news: some causes — refrigerant leaks, failed compressors — require a licensed HVAC technician and can cost real money.
This guide helps you figure out which situation you're in, so you're not calling a $200-an-hour technician for a problem you could fix with a $15 filter, and you're not trying to DIY something that genuinely requires a professional.
Before You Do Anything — Read This First
Two situations that require immediate action before any troubleshooting:
- If you smell something burning or see smoke near your AC unit or vents: Turn the system off at the thermostat and at the circuit breaker immediately. Call an HVAC technician. Electrical issues in HVAC systems can be a fire hazard.
- If you notice ice or frost on your indoor unit and the AC has been running continuously: Turn the system to "Fan Only" mode — not off, because you want airflow to help thaw it — and read the frozen coil section below before doing anything else. Running a frozen system hard can cause permanent damage to the compressor.
Neither situation is common. If neither applies, start with the quick checks below.
How Central AC Actually Works (The 60-Second Version)
You don't need an HVAC degree to troubleshoot your system, but understanding the basics makes the diagnostics click. Your central AC has two main units: the indoor air handler (usually in a closet, attic, or basement) and the outdoor condenser unit (the large box with a fan sitting outside your house). They work as a loop — refrigerant circulates between them, absorbing heat from your indoor air and releasing it outside.
When your AC is running but not cooling, the failure is almost always in one of three areas: airflow is restricted (dirty filter, blocked vents, frozen coils), the refrigerant loop has a problem (leak, low charge), or a mechanical or electrical component has failed (capacitor, compressor, thermostat). The troubleshooting below follows that same logic — start with airflow, then move to mechanical and electrical causes.
Quick Checks You Can Do Right Now
Run through these before assuming you need a technician. In order of how often they actually solve the problem:
1. Check and Replace Your Air Filter
Difficulty: Easy | Time: 5 minutes | Cost: $8–$30
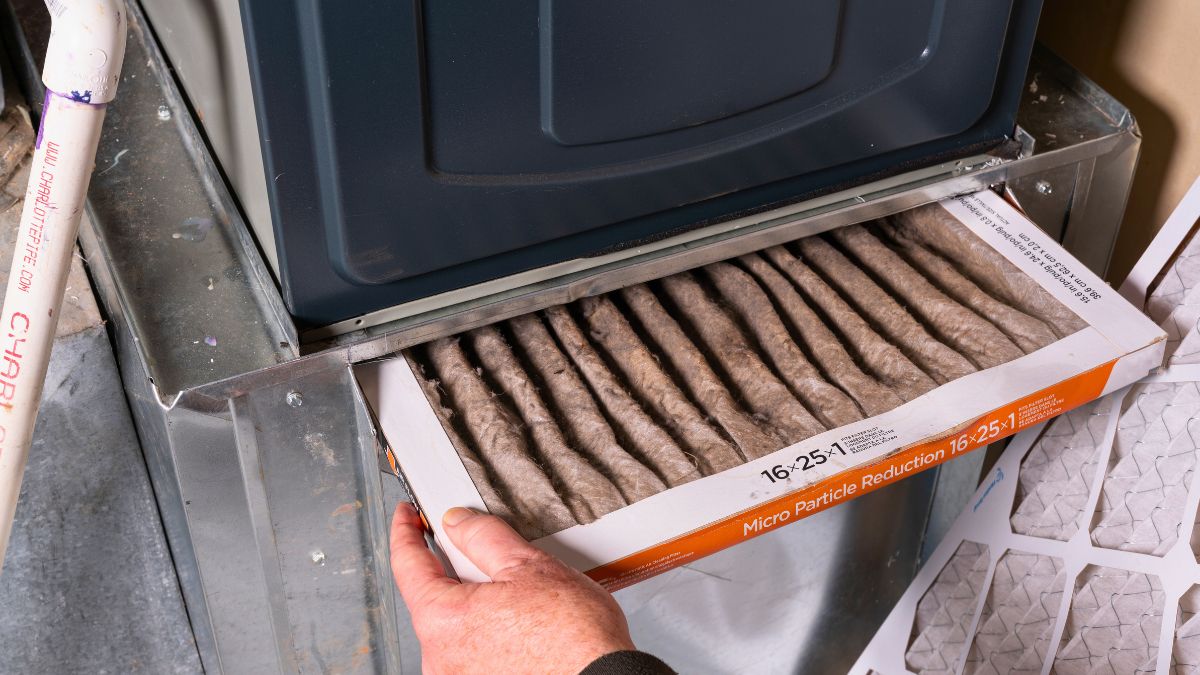
A clogged air filter is the single most common reason an AC underperforms or stops cooling entirely. When the filter gets too clogged, airflow drops so severely that the evaporator coils get too cold — they freeze over, and now you have a bigger problem on top of the original one.
Find your air filter — it's either in a return air vent on a wall or ceiling (a large vent with a grille that pulls air in rather than pushing it out) or inside the air handler unit itself. Pull it out and hold it up to the light. If you can't see light through it, replace it immediately. If it looks moderately gray and dusty, it's overdue even if not completely blocked.
Replace it with the same size (printed on the frame of the old filter), reinstall, and give the system 20–30 minutes to recover before drawing conclusions.
How often to replace it: Every 1–3 months during heavy-use seasons. Every month if you have pets. This one habit prevents a significant percentage of AC breakdowns and extends your system's life — and it costs less than a cup of coffee per month.
2. Check the Thermostat Settings
Difficulty: Easy | Time: 2 minutes | Cost: $0
It sounds too simple — but thermostats get bumped, kids mess with settings, and smart thermostats can glitch after a power outage.
Verify three things: the system is set to "Cool" (not "Heat," not "Fan Only"), the set temperature is below the current room temperature, and the fan is set to "Auto" rather than "On." That last one trips up a lot of people. With the fan set to "On," it runs continuously — including when the compressor isn't actively running a cooling cycle — which means you'll feel room-temperature air from your vents even when the system is working correctly. Many homeowners mistake this for an AC problem.
If your thermostat runs on batteries, swap them out. A low battery can cause erratic behavior on many models.
3. Reset the Circuit Breaker
Difficulty: Easy | Time: 3 minutes | Cost: $0
Your central AC typically uses two circuit breakers — one for the indoor air handler and one for the outdoor condenser. A power surge or brief electrical fault can trip the outdoor unit's breaker, which produces exactly the symptom you're experiencing: the fan runs and air blows through vents, but it's not cold because the compressor isn't running.
Go to your electrical panel and find the breaker labeled for your AC or HVAC system. A tripped breaker sits in the middle position — not fully on or fully off. Reset it by pushing firmly all the way to "Off" first, then back to "On." Wait 3–5 minutes before turning the AC back on — this lets the refrigerant pressure equalize and protects the compressor from a hard start.
If the breaker trips again within a few minutes: don't keep resetting it. A repeatedly tripping breaker means there's an underlying electrical problem — a failing capacitor, a short, or a struggling compressor. Call a technician.
4. Inspect the Outdoor Condenser Unit
Difficulty: Easy | Time: 5–15 minutes | Cost: $0
Go outside and look at your condenser — the large unit with a fan on top or the side. The condenser's job is to release heat pulled from your home's air. If it can't breathe, cooling performance drops significantly.
Check for debris (leaves, grass clippings, cottonwood fluff) clogging the metal fins on the sides. Vegetation that's grown too close — you want at least 18–24 inches of clearance all around. Anything piled on top. And with the system running, watch whether the fan is actually spinning. A fan that's not turning despite the unit humming is a classic sign of a failed capacitor.
You can gently rinse the fins with a garden hose to clear debris — spray from the inside out if you can access it, or top-down from outside. Don't use a pressure washer; the aluminum fins bend easily. Also check the small disconnect box mounted on the wall near the outdoor unit — it contains a pull-out fuse block. Make sure it's fully seated and hasn't been accidentally pulled during yard work.
8 Common Reasons Your AC Isn't Cooling
If the quick checks above didn't solve it, one of these is the culprit. Ordered from most common and least expensive to least common and most expensive.
1. Dirty or Frozen Evaporator Coils
DIY Cost: $0–$15 (thawing; coil cleaner spray) | Pro Cost: $100–$400 (cleaning); $1,000–$2,500+ (coil replacement if damaged)
The evaporator coils live inside your air handler — they're the cold side of the loop that absorbs heat from your indoor air. When they get coated in dust (from a dirty filter) or when airflow drops too low, they get so cold that moisture in the air freezes on them. A block of ice can't absorb heat. Your system runs full blast and blows barely-cool air.
Signs of frozen coils: visible ice or frost on the insulated refrigerant lines running between your indoor and outdoor units, water pooling around the indoor unit as ice thaws, or dramatically reduced airflow from vents while the system sounds like it's running normally. See the frozen coil section below for the exact steps.
2. Low Refrigerant (Refrigerant Leak)
Pro Cost: $200–$1,500 to find and repair the leak; $100–$320 to recharge (R-410A systems)
Refrigerant is what makes cooling possible — it circulates through your system absorbing indoor heat and releasing it outside. Contrary to what some service calls imply, refrigerant doesn't get used up like fuel. Your system is a sealed loop. If the level is low, there is a leak somewhere in that loop.
Signs of low refrigerant: air from vents is slightly cool but never cold, the system runs much longer than usual without reaching the set temperature, ice forms on the refrigerant lines, or you hear a faint hissing or bubbling sound near the indoor or outdoor unit.
This is always a professional repair. Refrigerant is EPA-regulated — you need Section 608 certification to purchase and handle it. A technician will locate the leak, repair it, and recharge the system. Any technician who recommends simply "topping off" the refrigerant without addressing the leak is offering a temporary fix that will leave you in the same situation in 6–12 months. Push for the leak repair first.
A note on older systems: If your AC was installed before 2010, it likely uses R-22 (Freon), which was phased out by the EPA. R-22 is now scarce and expensive — recharging can cost $180–$600 or more, compared to $100–$320 for modern R-410A systems. If you have an R-22 system with a refrigerant leak, the economics often favor replacing the whole system rather than chasing increasingly expensive repairs.
3. Failed Capacitor
Pro Cost: $150–$400 (parts and labor)
The capacitor is a small cylindrical component inside the outdoor condenser that provides the electrical boost to start the compressor and fan motors. Think of it as the starter battery that gets the engine turning. When it fails, the motors can't start or run properly.
The symptom is distinctive: the outdoor unit hums but the fan spins slowly or not at all, or the system starts up briefly then shuts off within a few minutes. Capacitor failure is one of the most common AC repairs — especially on systems 5–10 years old, and especially at the start of a hot summer when the unit goes from idle to running hard overnight.
The part itself costs $15–$80. The majority of the $150–$400 total is the service call and labor. This is worth fixing promptly: a failing capacitor strains the compressor, and a failed compressor is a $1,800–$2,800+ repair. Don't ignore the early warning signs.
This is always a professional repair. Capacitors store a dangerous electrical charge even when power is disconnected. Working inside the condenser unit without proper discharge equipment can cause serious injury.
4. Dirty Condenser Coils
DIY Cost: $10–$20 (coil cleaner spray) | Pro Cost: $100–$400 (professional cleaning)
The condenser coils are the metal fins on the outside of your outdoor unit. Their job is releasing heat outside. When they're coated in a season's worth of dirt, pollen, cottonwood, and grass clippings, heat transfer drops and the whole system works harder for less cooling.
Cleaning them is one of the more reasonable DIY maintenance tasks. Turn off power at the disconnect box, remove any access panels if needed, spray the fins with a garden hose (gently — top down from outside, or inside out if you have access), and use a coil cleaning spray available at any hardware store. Let it foam and rinse. Restore power once dry. Do this every spring before the cooling season starts and it pays for itself many times over in efficiency and system lifespan.
5. Clogged Condensate Drain Line
DIY Cost: $0 (wet/dry vac) | Pro Cost: $75–$250
As your AC cools the air, it removes humidity. That moisture condenses on the evaporator coils and drips into a drain pan, then exits through a condensate drain line — typically a PVC pipe you can trace from the indoor unit to an exterior wall, floor drain, or utility sink. Over time, algae and mold can clog this line. When it clogs, the drain pan overflows, triggering a safety float switch that shuts the system down — or causing water damage if the switch fails.
Signs of a clogged drain: water pooling around the indoor unit, the system shutting off unexpectedly during humid weather, or a musty smell from the vents.
The fix is often DIY-able. Find the PVC access cap near the indoor unit and either suction the line clear from the outdoor end with a wet/dry vac, or pour a cup of distilled white vinegar through the access point to kill algae buildup. Do this every few months as preventive maintenance during cooling season.
6. Thermostat Failure
DIY Cost: $20–$300 (replacement thermostat, depending on type) | Pro Cost: $100–$350 installed
If the thermostat itself has failed or is badly miscalibrated, it won't correctly signal the AC to run a cooling cycle. Signs: the system doesn't respond when you adjust the set temperature, the temperature reading seems way off from what you feel in the room, or the system short-cycles — turns on and off in rapid bursts.
A basic thermostat is replaceable by most homeowners: turn off the system at the breaker, photograph the existing wiring before disconnecting anything, connect the new thermostat using the same wires to the same terminals, restore power. Smart thermostats like Nest and Ecobee have guided setup in their apps. If you're not comfortable with wiring, a technician can swap a thermostat in under an hour.
7. Leaking or Blocked Ductwork
Pro Cost: $200–$700 to seal leaks; more for extensive repair or replacement
If your AC cools some rooms well but others stay stubbornly warm, leaking ductwork is worth investigating. Conditioned air escaping into your attic or wall cavities before reaching living spaces is a major efficiency loss — the Department of Energy estimates duct leakage can account for 20–30% of a home's energy loss.
A simple test: hold a lit incense stick near the joints and seams of any exposed ductwork. If the smoke gets pulled toward or pushed away from the duct, there's air movement indicating a gap. Accessible joints can be sealed with mastic sealant or metal-backed tape (not regular duct tape, which fails in a few years). Ductwork inside walls or in difficult-to-reach attic spaces requires a professional with duct sealing equipment.
8. Failing or Failed Compressor
Pro Cost: $1,800–$2,800 average; can exceed $3,000 for larger systems
The compressor is the heart of your AC — it pressurizes the refrigerant and drives the entire cooling cycle. When it fails, nothing cools. Signs of compressor trouble: loud grinding, clanking, or rattling from the outdoor unit, the system not starting despite power being on, a burning smell from the outdoor unit, or a circuit breaker that trips repeatedly.
Compressor replacement involves draining and recharging the entire refrigerant system, brazing copper lines, and extensive electrical work. It requires a licensed, EPA-certified technician with specialized equipment. Never attempt this as a DIY repair.
The honest math on replacement vs. repair: if your system is under 8 years old and still under warranty, replacing just the compressor makes sense. If it's 10+ years old, run the 50% rule — if the repair costs more than 50% of a new system, replace the whole unit. A new central AC system installed typically runs $3,500–$7,500 depending on size and efficiency rating, but comes with a fresh 10-year warranty and significantly lower monthly energy costs than a failing older system.
Is Your AC Frozen? Here's What to Do
A frozen AC looks alarming but is usually fixable — as long as you handle it correctly and find the underlying cause.
How to Tell If Your Evaporator Coil Is Frozen
Look at the insulated copper refrigerant lines running between your indoor and outdoor units. Frost or ice on the line near the indoor unit means your evaporator coil is likely frozen. You may also notice ice visible through the inspection panel on the air handler, water dripping around the indoor unit as ice thaws, or dramatically reduced airflow even though the system sounds like it's working fine.
How to Safely Thaw It
- Turn the thermostat from "Cool" to "Fan Only." This keeps airflow moving over the coils to speed thawing, while stopping the compressor from continuing the cooling cycle and making things worse.
- Do not turn the system completely off if you want to thaw faster — without airflow, ice can take 6–8 hours to melt. Fan Only mode speeds this up to 2–4 hours.
- Replace the air filter right now if you haven't recently. A restricted filter is the most common cause of a frozen coil — address it before restarting cooling.
- Place towels around the base of the indoor unit to catch drips as the ice melts. Keep the drain pan clear.
- Once fully thawed, switch back to "Cool" and monitor the next hour. Air from vents should be noticeably colder within 15–20 minutes if airflow restriction was the only issue.
If the coils freeze again within a day or two, the cause wasn't just a dirty filter. You likely have a refrigerant leak or a more significant airflow problem. Call an HVAC technician rather than keep thawing and refreezing — you risk compressor damage.
DIY Fix or Call a Technician? Here's How to Decide
Repairs Most Homeowners Can Handle
| Repair | Difficulty | Time | Cost | Skills Needed |
|---|---|---|---|---|
| Replace air filter | Easy | 5 min | $8–$30 | None |
| Adjust thermostat settings | Easy | 2 min | $0 | None |
| Reset circuit breaker (once) | Easy | 3 min | $0 | Know where your panel is |
| Clear debris from condenser unit | Easy | 15 min | $0 | Garden hose |
| Thaw frozen evaporator coil | Easy | 2–4 hrs (waiting) | $0 | Patience |
| Clear condensate drain line | Easy–Moderate | 15–30 min | $0–$10 | Wet/dry vac helpful |
| Clean condenser coils | Moderate | 30–45 min | $10–$20 | Comfortable shutting off power and using a hose |
| Replace thermostat | Moderate | 30–60 min | $20–$300 | Basic wiring comfort |
Repairs That Always Require a Licensed HVAC Technician
| Repair | Why It Needs a Pro | Typical Cost |
|---|---|---|
| Refrigerant leak repair + recharge | EPA-regulated; requires Section 608 certification to handle refrigerant | $200–$1,500 |
| Capacitor replacement | Stored electrical charge is dangerous without proper discharge tools | $150–$400 |
| Evaporator coil replacement | Involves the refrigerant system and internal air handler components | $1,000–$2,500+ |
| Compressor replacement | Requires refrigerant recovery, brazing copper lines, specialized tools | $1,800–$2,800+ |
| Electrical wiring repairs | Shock and fire hazard without proper training and equipment | $150–$600 |
| Full system replacement | Requires load calculations, permits, and proper installation | $3,500–$7,500+ |
What AC Repairs Actually Cost (And How to Avoid Overpaying)
Here's the honest breakdown of what HVAC repairs run in 2025, based on national data:
- Diagnostic / service call fee: $75–$150 (often credited toward the repair if you proceed)
- Condensate drain line cleaning: $75–$250
- Capacitor replacement: $150–$400
- Thermostat replacement: $100–$350 installed
- Refrigerant recharge (R-410A): $100–$320; R-22 systems: $180–$600+
- Refrigerant leak repair + recharge: $200–$1,500 depending on location and severity
- Fan motor replacement: $400–$900
- Evaporator coil replacement: $1,000–$2,500 under warranty; up to $4,500 out of warranty
- Compressor replacement: $1,800–$2,800 average; can exceed $3,000
- Emergency / after-hours labor: $160–$250 per hour (versus the standard $75–$150 per hour during business hours)
Red Flags in an HVAC Quote
- No itemized breakdown. You should be able to see service call fee, parts cost, and labor separately. If a technician won't give you this, ask directly. A legitimate contractor has nothing to hide.
- "Your system just needs more refrigerant." Refrigerant doesn't deplete. If a tech wants to add refrigerant without locating and repairing the leak, they're giving you a temporary patch and you'll be paying for another recharge within the year.
- Compressor replacement quoted for a system over 12 years old without discussing full system replacement. Ask explicitly: "Given the age of my system, does replacing just the compressor make financial sense?"
- Pressure to decide immediately. A legitimate diagnosis doesn't have a 24-hour expiration. Get a second opinion for any repair over $500.
- The three-quote rule: For any repair over $300, get three quotes. HVAC pricing varies significantly between companies — not always due to quality differences, but because of overhead, markup, and how busy they are that week.
Not sure what's wrong with your AC?
Match2Fix asks you a few quick questions about your symptoms and tells you what's likely wrong — in 30 seconds, with no sales pitch and no spam. Walk into every contractor conversation informed.
Get Your Free Diagnosis →How to Stay Cool While You Wait for Repair
If you've determined you need a technician and it'll be a day or two, here's how to keep your home livable:
- Close blinds and curtains during daylight hours, especially on south- and west-facing windows. Direct sunlight through glass raises a room's temperature by 10–15°F on a hot day.
- Use fans strategically. A ceiling fan on the counterclockwise setting (when viewed from below) creates a downdraft that makes occupants feel cooler. A box fan in a window at night — facing outward on one side, with a window open on the opposite side — pulls cooler outdoor air through the house.
- Minimize heat-generating appliances. Oven use in the afternoon, running the clothes dryer, and even large numbers of incandescent bulbs add measurable heat. Use the microwave, grill outside, and hang laundry to dry if possible.
- Focus cooling where people sleep. If you have a portable AC or window unit, prioritize bedrooms at night. Sleep deprivation in a hot house compounds quickly and affects everything else.
- Know when to leave. For households with infants, elderly residents, or people with medical conditions, extreme indoor heat is a genuine health risk. If indoor temperatures are climbing above 85–90°F and not dropping at night, consider staying with family, a hotel, or an emergency cooling center if your municipality has one.
Frequently Asked Questions
Why is my AC running but not cooling the house?
The most common causes are a clogged air filter restricting airflow, low refrigerant from a leak, frozen evaporator coils, or a failed capacitor preventing the compressor from running. Start by checking and replacing your air filter, verifying thermostat settings, and resetting the circuit breaker. If none of those resolve it, you likely need an HVAC technician to diagnose a mechanical or refrigerant issue.
How do I reset my AC when it's not cooling?
Set the thermostat to "Off." Go to your electrical panel and turn off the breaker for the AC system — there may be two, one for the indoor unit and one for the outdoor condenser. Leave power off for 5 minutes to allow the system's refrigerant pressure to equalize. Restore the breaker, set the thermostat back to "Cool" below the current room temperature, and give the system 15–20 minutes to start cooling properly before evaluating whether the reset helped.
How much does it cost to recharge AC refrigerant?
An AC refrigerant recharge for a modern R-410A system costs $100–$320 on average. Older systems using R-22 (phased out after 2020) cost significantly more — $180–$600 or higher due to scarcity. However, a reputable technician will not simply recharge your refrigerant without first finding and fixing the leak that caused the low level. If a tech recommends just "topping it off," that's a red flag — push for leak diagnosis and repair first.
Can I add refrigerant to my AC myself?
No. Refrigerant is a controlled substance under EPA regulations. Purchasing and handling HVAC refrigerant requires EPA Section 608 certification. Attempting to add refrigerant without certification is both illegal and dangerous — refrigerant can cause frostbite on contact and displace oxygen in enclosed spaces.
Why is my AC running but only blowing slightly cool air?
Slightly cool air (not cold) while the system is running typically points to low refrigerant, dirty evaporator or condenser coils reducing heat exchange, or a failing compressor. Start with the free checks — replace the filter, clear debris from the outdoor unit. If that doesn't bring temperatures down meaningfully, call an HVAC tech to check refrigerant levels and run a full diagnostic.
How long does a central AC system last?
A well-maintained central AC system typically lasts 12–15 years. Systems in hot climates that run hard for 6–8 months a year may be on the shorter end. The most important factors in longevity are consistent annual tune-ups, monthly filter changes during cooling season, and keeping the outdoor unit clear of debris. When your system approaches 10–12 years and starts needing repairs, begin planning for replacement rather than chasing repairs on aging equipment.
Is it worth repairing an old AC system?
Use the 50% rule: if the repair costs more than 50% of what a new system would cost, and your current system is 10+ years old, replacement is almost always the better financial decision. A new system comes with a 10-year warranty, runs significantly more efficiently, and won't need another major repair in 18 months. The exception: if your system is under warranty and the failed part is covered, repair is the obvious call regardless of age.
What's an AC tune-up and do I actually need one?
A tune-up is preventive maintenance — a technician cleans coils, checks refrigerant levels, inspects electrical connections including the capacitor, lubricates moving parts, and tests system performance. It typically costs $75–$200 and should be done annually in early spring before the cooling season. Staying current on tune-ups is the most reliable way to catch small problems (like a weakening capacitor or slightly low refrigerant) before they turn into expensive failures during a July heat wave.
Get instant answers about your AC
Describe your symptoms, and Match2Fix tells you what's likely wrong — in 30 seconds, with no spam and no contractor kickbacks. Just honest answers.
Try Match2Fix Free